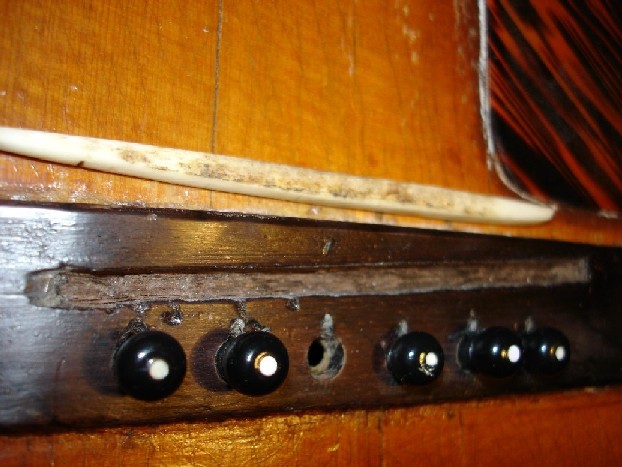
Official Luthiers Forum!
http://www-.luthiersforum.com/forum/

same prject - 2
http://www-.luthiersforum.com/forum/viewtopic.php?f=10102&t=11596
Page 1 of 2

Author:  tony [ Wed Apr 11, 2007 2:07 am ]
Post subject: 

The bridgeplate -


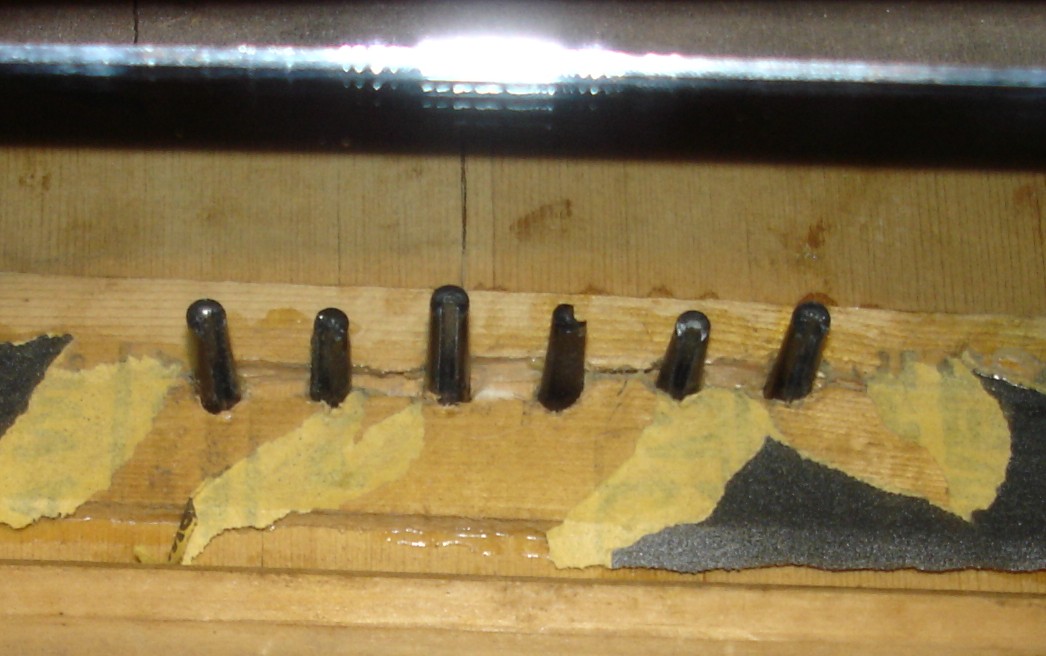
As you can see – there is no wood between the bridge pins. I’m not sure, but I would guess that the glued paper may have been added at sometime to either help prevent the bridge plate from cracking, or to keep it from getting worse. And as I said earlier this bridgeplate goes all the way across the top – from side to side. It looks like it was made from spruce, which may explain why it looks on the thick side to me.

I don’t know how (or why) you would repair a bridgeplate in this kind of shape (both literally and figuratively speaking). I’m thinking that it needs to be replaced, and the replacement be made the size of the bridge (not the full width of the top) from better materials.

I’m thinking this would impove the sound.

Author:  tony [ Wed Apr 11, 2007 2:28 am ]
Post subject: 


The saddle is about as wide as it is tall. Would you believe – there was lint balls and dirt underneath the saddle down in the slot. The slot in the bridge looks like it was carved out with a pocket knife – heck the bridge looks like it was carved out with a pocket knife.


As you can see, there isn’t much bridge height. And you notice the bridge pins aren’t seated all the way down.

And a close inspection of the top around bridge area suggests that this was either a replacement for the original – or the original had to be re-glued. Sloppy work.

Instead of replacing the bridge, I’m tempted to try and square up the sides and bottom of the slot for the saddle and not replace the bridge. Mainly, because I don’t want to have to deal with neck angle issues with a new taller bridge.

I need to ream the pin holes and replace the pins.

I’ve order a bone saddle blank (little larger than the slot is now) and bone pins.

I don’t mind the appearance at all. Actually, I think it adds character – she is this way because… But these are the kind of improvements I think can be made.

Author:  Dave Rickard [ Wed Apr 11, 2007 3:59 am ]
Post subject: 

Cool, I seem to like this kind of stuff more than a new build. Do you know who made it and when?

Author:  JohnAbercrombie [ Wed Apr 11, 2007 4:06 am ]
Post subject: 

Tony-
Thanks for the pics.

I'd say the bridge plate is the tricky (and necessary part of the repair. Hopefully you will get some ideas from experienced repair people about how to do that. In the meantime you might consider some conservative methods for getting that sandpaper? off the bridge plate without removing the plate.


[QUOTE=tony]
As you can see, there isn’t much bridge height. And you notice the bridge pins aren’t seated all the way down.

.......
I need to ream the pin holes and replace the pins.

I’ve order a bone saddle blank (little larger than the slot is now) and bone pins.

I don’t mind the appearance at all. Actually, I think it adds character – she is this way because… But these are the kind of improvements I think can be made.
[/QUOTE]

I'd strongly suggest leaving the bridge pin holes at the current size and shaving down/turning down the bridge pins if the looks are important to you. Somebody with a lathe and a few minutes to improvise could do this for you, or you could probably figure out a way to do it by hand with a simple jig. Functionally, the pins are probably doing the job as they are.

I'd also not worry about the bridge height too much at this point, though it was probably cut down to 'improve the action' (kinda a cheap alternative to a neck reset) at some time. That would explain the 'deepening' of the saddle slot, since shaving the bridge would have left the slot too shallow. This is also why the pins don't seat properly, since they are sitting in the taper at the original height- the pins are showing you where the top of the bridge once was.

Cleaning up the bridge slot (esp the bottom) and making a new saddle should improve the tone. Again, I would be careful not to make the slot any wider than necessary- it's fairly easy to sand down a saddle to the required width, as you know.

Neat project! You probably noticed that one of these guitars with smashed sides went for just under $400 recently on eBay?

Cheers

John

Author:  tony [ Wed Apr 11, 2007 4:09 am ]
Post subject: 

This is a late 30's (if I can believe the person I bought it from) Kalamazoo KG-14, made by Gibson in Kalamazoo, Michigan. It was their "economy" version of the L-00. It has a serial number on the neck block, but I'm not sure where to research when the production date would be. Any one know?

I guess the biggest name attached to this particular make/ model was the great Robert Johnson. It is strongly held belief by many (with good reason) that RJ owned and recorded his songs on a KG-14.


Author:  JohnAbercrombie [ Wed Apr 11, 2007 4:14 am ]
Post subject: 

[QUOTE=Dave Rickard] Cool, I seem to like this kind of stuff more than a new build. Do you know who made it and when? [/QUOTE]
Dave-
It's a Kalamazoo KG-14 from the 30s. (Gibson budget line)
They turn up on eBay from time to time.
(Tony started this discussion in another thread where he mentioned the model #).

Cheers
Johm

Author:  CarltonM [ Wed Apr 11, 2007 6:33 am ]
Post subject: 

Okay, Tony, here's my 2/100ths. You'll be sorry if you put all that work into this guitar, and don't reset the neck. Your stated goal is to make this baby sound its best, but it won't without a proper neck angle. That, of course, ties in with the bridge. It's just too low. I agree with John that it has probably been shaved down to avoid a neck reset (always a bad idea, IMHO). The bridge functions as a brace, too. It's not just there to hold the saddle. Gotta make a new bridge. The bridge plate: think of it as a low, wide brace. I think that Gibson, for better or worse, put it across the body width for structural reasons. It needs to be replaced, full width, with spruce. Now, to beef up the plate's string-holding ability, I'd suggest gluing a maple veneer over the spruce where the string holes go. It'll then be just like new, only better.

This guitar is just too beat to have collector value, but it would be much more valuable, both monetarily and to a player, if it is restored. Keep everything as original as possible, but make it playable. There's still some good music inside this honey!

Author:  JohnAbercrombie [ Wed Apr 11, 2007 6:51 am ]
Post subject: 

re: Carlton's comments-
Carltons right on the money, but that's a fairly high-skill set of operations. (I know from experience- the first reset I did was on a dark sunburst guitar and had to spend hours hiding finish chips around the neck and fingerboard.)
However, your pics show you're comfortable working through the soundhole, so it may be a good project. I'd probably 'rehearse' on a newer junker guitar, but I'm a bit of a coward about these things.

You can always do the minor stuff- fix the saddle slot, etc and see how you like the guitar. Then you can move on to the major repair (neck reset, replace bridge and bridgeplate) later.

BTW, that bridge plate looks like it might have epoxy on it, which could make things interesting.

Cheers

John

Author:  CarltonM [ Wed Apr 11, 2007 7:50 am ]
Post subject: 

[QUOTE=JohnAbercrombie]Carltons right on the money, but that's a fairly high-skill set of operations.[/QUOTE]
True enough, John. It wouldn't be for the faint-of- heart. If Tony's got the will (and patience), though, he's got a lot of support here, if not locally, to help him through the steps. I bet that there's a pretty cool guitar hidden in that mess!

Oh, and Tony, in my above post I didn't mean to call you "honey."

Author:  tony [ Wed Apr 11, 2007 8:32 am ]
Post subject: 

[QUOTE=CarltonM]
Oh, and Tony, in my above post I didn't mean to call you "honey." [/QUOTE]

I'll try not ot be disappointed!

Author:  tony [ Wed Apr 11, 2007 10:04 am ]
Post subject: 

[QUOTE=CarltonM]
This guitar is just too beat to have collector value, but it would be much more valuable, both monetarily and to a player, if it is restored. Keep everything as original as possible, but make it playable. QUOTE]

You've pretty much summed up my sentiments in your last few sentences there Carlton.

Let me be clear. In retrospect, I think I paid more than it is actually worth in its present state. But I couldn't have known that at the time. However, (IMO) I paid less than the average price for one, and I have no buyer's remorse. This is an opportunity.

Furthermore, I'm not overly concerned about cosmetics. Nor am I interested in accurately preserving history. I agree with you, in her present condition - she's beyond all of that now. The only real potential worth I see in this 70 year old lady is how good she can be made to sound when she's being played. She's a player - or at least I think she can be.

So for me, my main focus in working through this is not going to be how - what I'm doing will affect its historic or collector value. And I'm not going to be focused on making a profit or protecting my investment. Right now, I don't have any plans to sell it when I'm finished. The education I get working through the project will be enough return on the investment for me.

Bottom line, I wanted this kind of guitar for me - to play some country and delta blues (part of my musical roots). This wasn't a mistake. I want to invest myself in her and love her back to life. She still has a lot of songs left in her - otherwise she wouldn't have ended up in my hands.

And if I trash it, oh well... I hope that I will have learned something along the way.

Enough already...

Author:  David Collins [ Wed Apr 11, 2007 10:46 am ]
Post subject: 

I just repaired a bridge plate today on a 30's Kalamazoo that looked
exactly the same as yours. The plate may not need to be replaced unless
you are trying to flatten out the top. If the chipped / worn spruce plate is
the only problem it can easily be patched and lightly capped. Unless the
top is seriously warped I would certainly not recommend pulling the
plate. If it did require pulling you would really have to replace with the
same size as the original, definitely no smaller. I just replaced a plate like
this on a 190x Vega flat top about a week and a half ago to flatten out a
seriously bellied top. With the Gibson top crown of the 30's this is rarely
an issue, even with a ladder braced guitar.

As to the bridge pins, dump those plastic slotted replacement pins that
are on it and get some unslotted ebony pins like it would have originally
had. Don't do any reaming until you have the new pins to fit. On the one I
just did I filled the missing spruce and glued a .050" maple cap just large
enough to cover the holes and support the ball ends.

Author:  Louis Freilicher [ Wed Apr 11, 2007 3:16 pm ]
Post subject: 

[QUOTE=David Collins] I just repaired a bridge plate today on a 30's
Kalamazoo that looked
exactly the same as yours. The plate may not need to be replaced unless
you are trying to flatten out the top. If the chipped / worn spruce plate is
the only problem it can easily be patched and lightly capped. Unless the
top is seriously warped I would certainly not recommend pulling the
plate. If it did require pulling you would really have to replace with the
same size as the original, definitely no smaller. I just replaced a plate like
this on a 190x Vega flat top about a week and a half ago to flatten out a
seriously bellied top. With the Gibson top crown of the 30's this is rarely
an issue, even with a ladder braced guitar. [/QUOTE]

I agree with David on this one. Pulling a bridge plate can be a serious
pain. If the top is not overly distorted I would recommend repairing and
capping the plate with maple.

David- could you give us a brief description on how you would approach
patching in that missing spruce?

Good luck with the project Tony, she's going to sound great when she's
back in shape!

Louis

Author:  David Collins [ Wed Apr 11, 2007 4:54 pm ]
Post subject: 

I wasn't photographing this repair, but since it came up I went to the shop
tonight to pull the clamps and take some quick shots. For the missing
spruce I simply cleaned up the edges with a razor blade and a short piece of
a file, then fit and glued in a piece of spruce to fill the gap. Really a 5-10
minute job. Then is the typical bridge plate cap - just a solid surface for the
ball end to bear on. I use thin hard maple or rosewod depending on the
original plate.


Author:  David Collins [ Wed Apr 11, 2007 5:07 pm ]
Post subject: 

I hadn't drilled the inner holes yet, but I pre-drill the outer two so that I
can use two 3/16" drill bit ends to locate it as I am placing it on the plate.
Then clamp, drill, clean up with reamer, and slot for strings. Not much to
it really. The spruce patch beneath the plate does not need to be perfectly
clean, and I could even accept debate as to whether it was necessary at all
under the cap. Still it didn't take much time, and I prefer not to leave a
hollow chamber between the cap and the top.

I often use the StewMac bridge plate repair / plug tool (one of the best
tools they've come out with) for damaged plates. In a case like this
however with a full missing section, I still prefer the cap. The one pictured
above is about .050" thick, although the beveled edges make it appear a
bit thicker in the photo.

Tony, in your case the time consuming part is going to be cleaning up
slop from the previous "repair". Scraping, sanding, time, patience, and
caution. It shouldn't be terribly difficult.

The instrument in the photo above is a 1933 KG-11. It had already had
the neck reset and been refretted, and was certainly worth having the
work put in to it. These can be absolutely excellent guitars, and have
really started to rise in value faster than I think most expected in recent
years. Take good care of it and you'll be quite happy.

Author:  tony [ Thu Apr 12, 2007 2:14 am ]
Post subject: 

Excellent David. Thank you very much for offering your insight and suggestions.

This was the one task that I saw myself getting radical with. I envisioned myself removing the bridge plate and replacing in with a wider but smaller plate from maple.

I even thought about taking the back off in order to fix a few other things at the same time.

The top is not deformed at all. So I'll approach the repairs as you have suggested.

According to the previous owner (luthier) - he reset the neck. It looks acceptable, but the angle is set for the short bridge - and the action is way too low. Frets are ok, but they don't have any height left.

So, in order to get the action up a little, I'm going to attempt to clean up the saddle slot and replace the saddle. And I'll replace the nut. This has to be done anyway, and taller may be all that is needed.

I'm not planning to replace the bridge at this time. Doing that would almost certainly demand a neck reset and new frets.

Any suggestions on the best way to approach cleaning up the saddle slot? Best way to surface the bottom - the dangers of going to deep and how to avoid it?


Author:  JohnAbercrombie [ Thu Apr 12, 2007 3:45 am ]
Post subject: 

David:Thanks for the photo of the repair and the details.
Legions of 'lurkers' are thanking you!

Tony:
For cleaning up the bottom of the slot I'd use my Dremel or similar with a simple Don Teeter-type set of rails to guide it.
Hopefully, David will add a few words on this topic as well.

Cheers

John

Author:  tony [ Thu Apr 12, 2007 9:20 am ]
Post subject: 

Bridge plate gets tackled first, then the saddle slot. That way if I screw things up too bad, I can replace the bridge before I commit the saddle and nut dimensions to the present requirements.

Stew-Mac delivered today, and its a 3 day weekend for me. And now its off to find a patch of maple. So look out...


Author:  tony [ Thu Apr 12, 2007 11:00 am ]
Post subject: 

OK. Back with some maple. A friend who is a luthier gave me a slab to cut from. Question. (excuse my ignorance) What is the best grain orientation for a bridge plate?

Author:  David Collins [ Thu Apr 12, 2007 12:06 pm ]
Post subject: 

When making the bridge plate itself I prefer quartered, parallel with the top
grain with X-braces, perpendicular for ladder braced. For a small bridge
plate cap however quartered or flat will be fine. It's function will not be for
any top support or transmission of vibrations through the top, but simply as
a hard stable surface to support the ball ends. Harder the better.

And for the record, the number on the block is a factory order number
rather than a serial number. The mid-late 30's numbers are not well
documented, so it's not very useful for dating. From the burst I would say
that is likely a '38, possibly a '39. Out of personal curiosity, do you have any
photos of the (kerfed or unkerfed) lining?

Author:  tony [ Thu Apr 12, 2007 12:30 pm ]
Post subject: 

For strength - does flat sawn and the grain direction set on a slight diagonal from the plate make sense? Seems quarter sawn run parallel or perpendicular to the grain direction of the plate would have a better chance of splitting. But I humbly defer to those who know...

Thanks for the response.

Author:  tony [ Thu Apr 12, 2007 12:32 pm ]
Post subject: 

I will try to post pic's of the kerfing later tonight - or at least let you know what was used.

Thanks again David.

Author:  tony [ Fri Apr 13, 2007 8:17 am ]
Post subject: 


Top and bottom shown.

Of interest. Cloth used to reinforce the sides and under the kerfing. Top and bottom braces and bridge plate are tucked under the kerfing, but have been narrowed next to nothing before they enter.

Hope this satisfied your curiousity. If not let me know what else you would be intereseted in...

Author:  tony [ Fri Apr 13, 2007 8:19 am ]
Post subject: 

[QUOTE=tony] For strength - does flat sawn and the grain direction set on a slight diagonal from the plate make sense? Seems quarter sawn run parallel or perpendicular to the grain direction of the plate would have a better chance of splitting. But I humbly defer to those who know...

Thanks for the response.[/QUOTE]

bump...

Page 1 of 2 All times are UTC - 5 hours
Powered by phpBB® Forum Software © phpBB Group
http://www.phpbb.com/